Table of Contents
MySQL for Excel enables you to work with a MySQL database from within Microsoft Excel. MySQL data can be imported into Excel, Excel data can be exported into MySQL as a new table or appended to a current table, and MySQL for Excel enables you to edit the MySQL data directly from within Excel.
Visit the MySQL for Excel forum for additional MySQL for Excel help and support.
For release notes detailing the changes in each release of MySQL for Excel, see MySQL for Excel Release Notes.
MySQL for Excel is a product for Microsoft Windows, and it is installed with MySQL Installer. And typically you will not be required to install or configure additional tools to use MySQL for Excel.
To install, download and execute the MySQL Installer. Select the MySQL for Excel product and then proceed with the installation. See the MySQL Installer manual for additional details.
MySQL for Excel Requirements
The MySQL Installer installation process will check if these requirements are met, or notify you if further action is required before proceeding with the installation.
.NET Framework 4.0 (Client or Full Profile).
Microsoft Office Excel 2007 or greater, for Microsoft Windows.
Visual Studio Tools for Office 4.0, and MySQL Installer may install this for you.
An available MySQL Server connection.
MySQL for Excel is loaded and executed by selecting the menu tab in Excel, and then choosing the "MySQL for Excel" Database icon. This opens a new Excel sidebar with the available MySQL for Excel options. The navigation bar with the MySQL for Excel icon is shown in the following screenshot:

MySQL for Excel enables you to load and edit MySQL data directly from Microsoft Excel. Changes are immediately committed if the Auto-Commit option is enabled, or done manually by pressing .
The feature exists as of MySQL for Excel 1.1.0.
The example below uses the category table of
the example sakila database, but the screen
will look the same for any table. Within MySQL for Excel, Open
a MySQL Connection, click the sakila
schema, , select the
category table, click Edit MySQL
Data, then choose to
import the data into a new Microsoft Excel worksheet for editing.
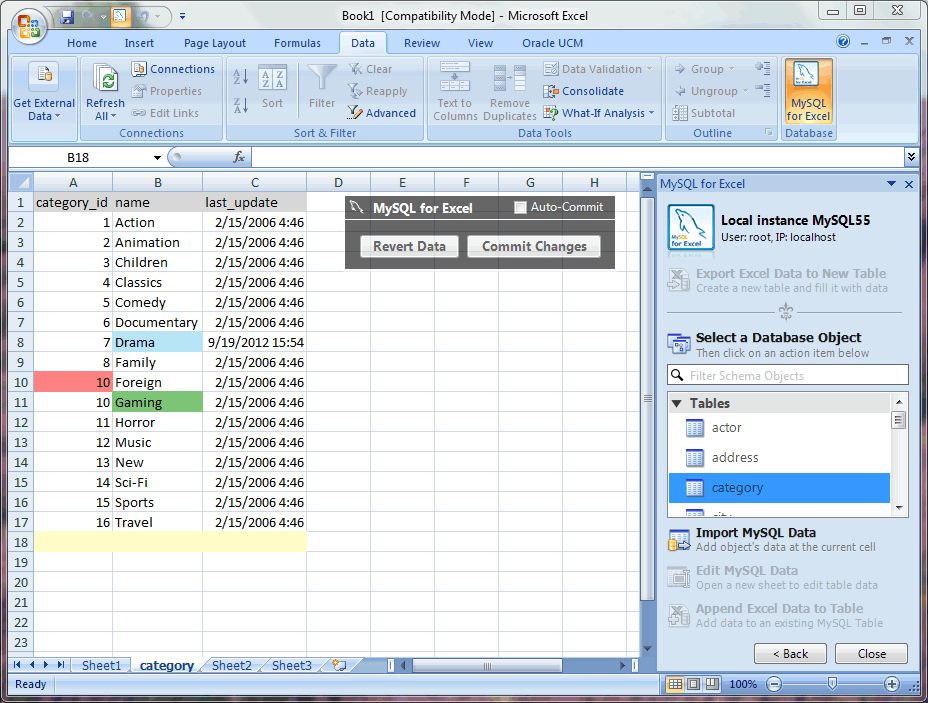
The background color represents the status of each cell, and there are four distinct colors that are used while editing table data:
Table 26.1. Background cell colors
| Color | Description |
|---|---|
| White | Default color for all cells. This is either the original data, or the data after is clicked. |
| Blue | Cells that were committed with success. |
| Green | Cells that were modified but have not yet been committed. |
| Red | Cells that generated an error when a commit was attempted. An error dialog is also displayed while the commit is attempted. |
| Yellow | Cells that accept new data. Data entered here is inserted into the MySQL table. |
In our example, the blue "Drama" field was changed and then committed first, then the green "Gaming" field was changed but not committed, and then Auto-Commit was enabled before changing the "9" to a "10" in column 10, which generated an error because this commit would have added a duplicate value as primary key.
Data can be imported from MySQL into a Microsoft Excel spreadsheet by using the Import MySQL Data option after selecting either a table, view, or procedure to import.
Choosing columns to import
By default, all columns are selected and will be imported.
Specific columns may be selected (or unselected) using the
standard Microsoft Windows method of either
Control + Mouse click to
toggle the selection of individual columns, or
Shift + Mouse click to select
a range of columns.
The background color of a column shows the status of each column. The color white means that the column has been selected, and therefore it will be imported. Conversely, a gray background means that the column will not be imported.
Right-clicking anywhere in the preview grid opens a context-menu
with either a Select None or Select
All option, depending on the current status.
Importing a table
The dialog while importing a table includes the following options:
Include Column Names as Headers: Enabled by default, this inserts the column names at the top of the Microsoft Excel spreadsheet as a "headers" row.
Limit to ___ Rows and Start with Row ___: Disabled by default, this limits the range of imported data. The
Limit tooption defaults to1, and defines the number of rows to import. TheStart with Rowoption defaults to1(the first row), and defines where the import begins. Each option has a maximum value of COUNT(rows) in the table.
Importing a table displays a dialog similar to the following:

Importing a view or procedure
Importing a view or procedure displays a similar dialogue, but with the following options:
Include Column Names as Headers: Enabled by default, this will insert the column names at the top of the Excel spreadsheet as a "headers" row.
Import: Because a procedure might return multiple result sets, the import options include:
: Imports the selected tab sheet. This is the default behavior.
: Imports all result sets into the Excel Worksheet horizontally, and inserts one empty column between each result set.
: Imports all result sets into the Excel Worksheet vertically, and inserts one empty row between each result set.
For example, a dialogue like the following is displayed after importing a procedure and pressing the button to invoke the stored procedure:

Data from a Microsoft Excel spreadsheet can be appended to a MySQL database table by using the Append Excel MySQL Data to Table option.
Column mappings
Mapping the Excel columns to the MySQL columns can be executed automatically (default), manually, or by using a stored mapping routine. An automatic mapping routine is the default, and can be can be tweaked if every column cannot be matched automatically. The following screenshot shows two columns of Excel data, and the preview dialog after choosing Append Excel Data to Table:

General mapping information
It is common to tweak the column mappings. A few notes about the manual mapping process:
Manual mapping is performed by dragging a column from the upper source grid (Excel spreadsheet) and dropping it into the lower target column MySQL table grid. Click anywhere within the column to initiate this dragging routine.
The color of the header field for each column defines the current mapping status of the column. The colors include:
Green: A source column is mapped to a target column.
Red: A target column is not mapped.
Gray: A source column is not mapped.
A source column may be mapped to multiple target columns, although this action generates a warning dialog.
Right-clicking a target column shows a context menu with options to either for a single column, or to for all columns. Dragging a target column outside of the grid removes the mapping.
Mapping methods
The three mapping methods are described below:
Automatic: The automatic mapping method attempts to match the Excel source column names with the MySQL target table column names. It is then possible to manually tweak the mapping afterwards.
If the automatic process finds zero columns to match, then a simple 1 to 1 matching routine is attempted. Meaning, SourceColumn #1 to TargetColumn #1, SourceColumn #2 to TargetColumn #2, and so on.
Manual: The source column names are manually dragged (matched) with the target column names. Manual dragging can also be performed after the Automatic method is selected.
Stored: Manual mapping styles may be saved using the button, which will also prompt for a name and then save it using a "
name(dbname.tablename)" naming scheme. The saved mapping style will then be available alongside the Automatic and Manual options.Stored mappings may be deleted or renamed within the dialog.
Advanced Options
There are several advanced options that are configured and stored between sessions for each Excel user. The dialog looks similar to:
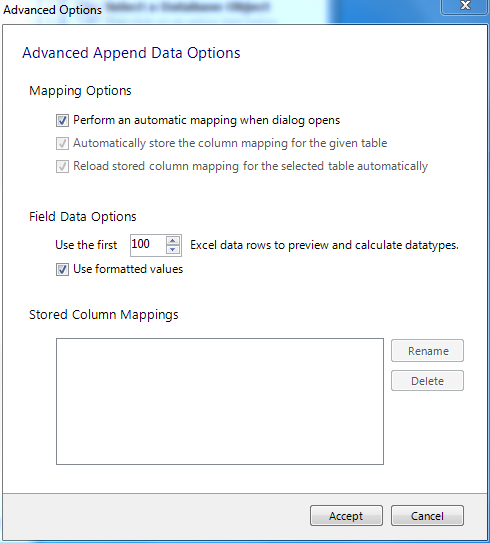
The advanced Mapping Options:
Perform an automatic mapping when dialog
          opens
: Automatically attempt to map the target and source when the Append Data dialog is opened. This feature is enabled by default.Automatically store the column mapping for the given table: Stores each mapping routine after executing the operation. The mapping routine is saved using the "tablenameMapping (dbname.tablename)" format. This may also be performed manually using the button. It is enabled by default, and this feature was added in MySQL for Excel 1.1.0.Reload stored column mapping for the selected table automatically: If a stored mapping routine exists that matches all column names in the source grid with the target grid, then it is automatically be loaded. This is enabled by default, and this feature was added in MySQL for Excel 1.1.0.
The advanced Field Data Options:
Use the first
100(default) Excel data rows to preview and calculate data types. This determines the number of rows that the preview displays, and the values that affect the automatic mapping feature.Use formatted values: The data from Excel is treated as
Text,Double, orDate. This is enabled by default. When disabled, data is never treated as aDatetype, so for example, this means that a date would be represented as a number.
The Stored Column Mappings is a list of saved column mappings that were saved with with the "Automatically store the column mapping for the given table" feature, or manually with the option.
Data from a Microsoft Excel spreadsheet can be exported to a new MySQL database table by using the Export Excel Data to New Table option. Exporting data looks like so:

Advanced Export options
Several advanced options enables you to tweak the exported data. The advanced options dialog looks like so:
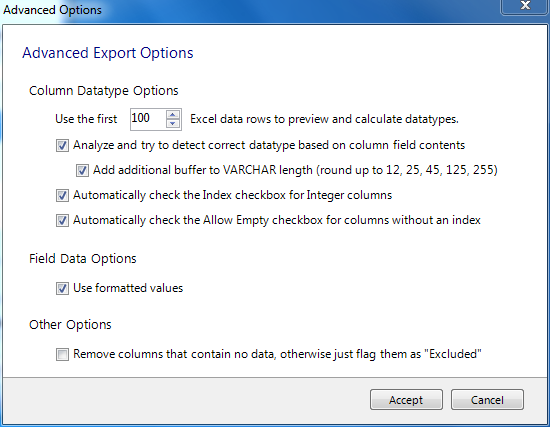
Column Datatype Options:
Use the first
100(default) Excel data rows to preview and calculate data types: This determines the number of rows that the preview displays, and the values that affect the automatic mapping feature.Analyze and try to detect correct datatype based on column field contents: Attempts to analyze the data and determine the data type for the column. The column type is defined as
VARCHARif it contains multiple types.Add additional buffer to
VARCHARlength (round up to 12, 25, 45, 125, 255): When the data type is automatically detected and is set toVARCHAR, then it calculates the maximum length for all rows within the column, and rounds up the maximum length to one of the defined lengths above.If disabled, then the
VARCHARlength is set to the length of the longest entry in the Excel spreadsheet.Automatically check the Index checkbox for Integer columns: If enabled (default), columns with an Integer data type will have the Create Index option enabled by default.
Automatically check the Allow Empty checkbox for columns without an index: If enabled (default), columns without the Create Index checkbox checked will automatically enable the Allow Empty configuration option.
Field Data options:
Use formatted values: When enabled (default), the data from Excel is treated as
Text,Double, orDate. When disabled, data is never treated as aDatetype, so for example this means that a date would be represented as a number.
Other options:
Remove columns that contain no data, otherwise flag them as "Excluded": If enabled, columns without data in Excel are removed and not shown in the preview panel. If disabled (default), these columns will exist but have the Exclude Column option checked. This option was added in MySQL for Excel 1.1.0.
Frequently Asked Questions, with Answers.
Questions
27.6.1: I installed the MySQL for Excel plugin, but can't find it in Microsoft Excel. How do I start it?
27.6.2: I click on Edit Data and after importing the table data into Excel, I can't sort or move columns around. How can I do that?
27.6.3: When editing a MySQL table's data, the Excel worksheet where the data is dumped is protected. How can unprotect it?
27.6.4: The MySQL Workbench connections that use SSH tunneling appear grayed out (disabled) in MySQL for Excel. How can I use a SSH connection?
Questions and Answers
27.6.1: I installed the MySQL for Excel plugin, but can't find it in Microsoft Excel. How do I start it?
The MySQL for Excel plugin is automatically added to Microsoft Excel's data menu when it is installed. Look for the MySQL for Excel icon, by default it will be listed on the right side of the main menu.
If it's not there, then you might have to reinstall the plugin. But before doing so, first check if it's listed under "Add/Remove Programs" in Microsoft Windows. If not, then it has not been installed. Next, check the Excel Add-Ins list. For Office 2007 this is found by clicking the Office logo in Excel (top left corner), click , then select Add-Ins. Is MySQL for Excel listed as a COM Add-in? If so, then consider filing a bug report (bugs.mysql.com), or attempt to reinstall the plugin.
27.6.2: I click on Edit Data and after importing the table data into Excel, I can't sort or move columns around. How can I do that?
In order to maintain the mapping of rows and columns in the Excel Worksheet against the rows and columns in the MySQL table, no alteration is permitted on the worksheet (i.e. sorting, deleting rows, deleting columns). If you need to alter the data there you can do that by right-clicking the Edit Data window and selecting Exit Edit Mode.
27.6.3: When editing a MySQL table's data, the Excel worksheet where the data is dumped is protected. How can unprotect it?
The Excel worksheet is protected to not allow alterations to the order of rows and columns. The password used for the protection is a GUID auto-generated at runtime so that the protection is not violated in any way. If you wish to unprotect the worksheet to manipulate your data, you can do that by right-clicking the Edit Data window and selecting Exit Edit Mode.
27.6.4: The MySQL Workbench connections that use SSH tunneling appear grayed out (disabled) in MySQL for Excel. How can I use a SSH connection?
This is a known limitation of MySQL for Excel. MySQL for Excel uses MySQL Connector/NET to connect and communicate with MySQL databases. Connector/NET does not have SSH support, so the behavior will change if Connector/NET supports it in the future.